Kategorie: "Basteln"
Sauguino - die vollautomatische Plattenwaschmaschine
6. Januar, 2013Zwischen den Jahren hatte ich endlich mal ein bisschen Zeit und hab mich an ein lange wartendes Bastelprojekt gemacht... eine Plattenwaschmaschine. Die Threads hier zu den Bastelprojekten haben mich ungemein inspiriert, allein ich wollte es so komfortabel wie nur irgend möglich, denn mir verging bei den manuellen Methoden meist nach drei oder vier Platten die Lust am Waschen.
Sauguino PWM - the comfortable automatic record washer from Friedemann Wachsmuth on Vimeo.
Als Basis diente ein alter Dual 1226, den ich extra dafür angeschafft hatte (5,- EUR in der Amateurbucht). Sein Reibradantrieb hat mächtig Drehmoment. ![]() Ansonsten gab's als Anschaffung nur noch die Pollin-Vakuumpumpe (9,95) und einen Arduino Micro für die Steuerung (20,-). Nahezu alle anderen Teile flogen in Bastelkisten rum oder kosteten nur Cents (wie die mir ausgegangenen 2k2 Widerstände...)
Ansonsten gab's als Anschaffung nur noch die Pollin-Vakuumpumpe (9,95) und einen Arduino Micro für die Steuerung (20,-). Nahezu alle anderen Teile flogen in Bastelkisten rum oder kosteten nur Cents (wie die mir ausgegangenen 2k2 Widerstände...)
Mein Ziel war es, den Plattenwaschprozess so weit wie möglich zu automatisieren, damit man nicht ständig daneben sitzen muss. Dazu brauchts folgende Aktoren:
- Natürlich den Plattenspielermotor zum Drehen
- Elektromagnet, um die Bürste (ich nehm dieses Clearaudio Samt-Teil) hochzuklappen
- Vakuupumpe für Punktabsaugung
- Elektromagnet, um den Tonarm anheben zu können (ungedämpft reicht...)
- Servo, um den Tonarm einigermaßen genau steuern zu können
Dazu hab ich den Dual erstmal kräftig zerlegt -- leider hatte ich während der Bastelei keine Lust auf Fotos.
Auf diesem Nachher-Bild kann man die Umbauten aber ganz gut erkennen:
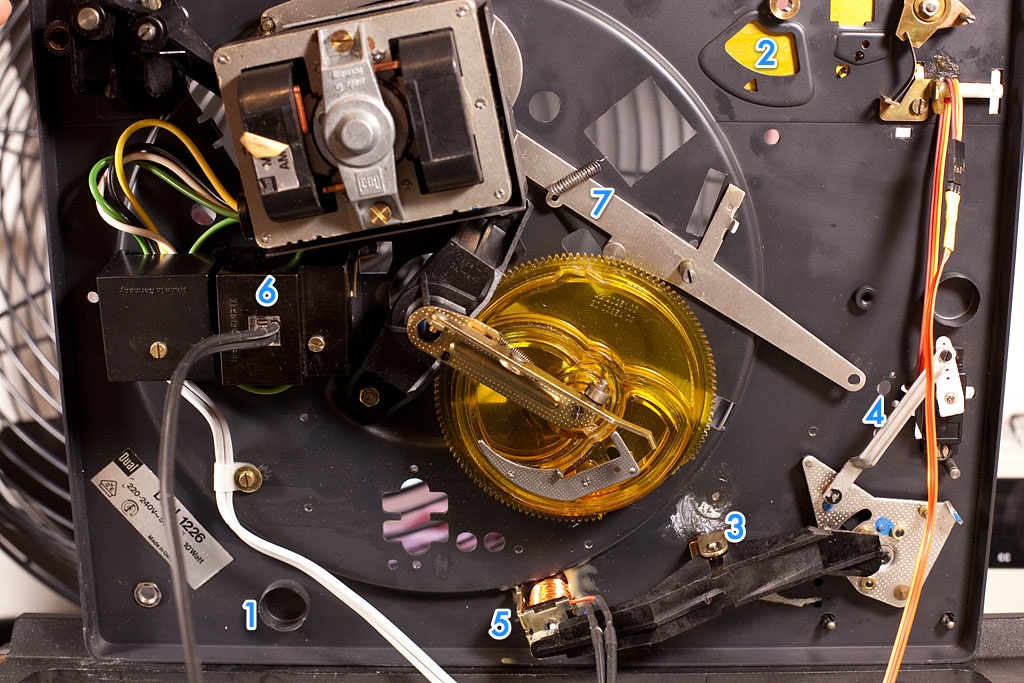
1: Als erstes habe ich Platinenfedern rausgerissen. Eine PWM muss schliesslich nicht entkoppelt sein. Das Chassis liegt jetzt einfach auf einem Streifen Tesa Moll, so läuft auch kein Wasser unten ins Gehäuse.
2: Die Hebel und Teile für Antiskating, Lift und Start/Stop habe ich alle entfernt. Den Tonarm steuere ich jetzt selber, den Plattentellermotor ebenso. Ausserdem lieferte das mir einige praktische Teile, die ich zweckentfremden konnte ![]()
Der 33/45-Wähler ist geblieben. Schadet nicht. Im Moment wasche ich mit 45 upm.
3: Diese Wippe wird an sich durch die Steuerscheibe (gelb) bewegt und gedrückt und bewegt dadurch den Tonarm. Da ich die Steuerscheibe nicht ausgebaut bekommen habe, habe ich den Wippendrehpunkt ein Stück nach aussen versetzt, das Ding ein bisschen zurecht gehobelt und einen kleinen Elektromagnet (5) drunter geklebt. Zieht der an, hebt sich der Tonarm. Das Silikonöl musste ich allerdings fluten, damit dessen Kraft reicht. Der Magnet stammt aus irgendeinem alten Kassettenrekorder...
4: Der Dremel und die Trennscheibe haben Platz für einen Mini-Servo geschnitten, der jetzt oben unterm Tonarm rausguckt (s.u.). Ein Stück vom alten Automatikgestänge war nahezu perfekt geformt, um den Tonarm mittels Servo über die ganze Platte hin und her zu bewegen. Die Wippe (3) musste ich ein bisschen zurecht sägen, damit sie nicht mit dem Steuerarm ins Gehege kommt. Beachtlich, wie viel Kraft so ein Servo hat und wie oft er einem die schönsten Basteleien flugs wieder zerlegt...
6: Hier drin sitzt der Schalter für den Motor. Ich hab mich einfach auf dessen Kontakte gelötet, das Kabel zugentlastet durchgeführt und die Kappe wieder drauf geschraubt. Das Schalten übernimmt jetzt ein Relais -- das einzige mit 230V drauf.
7: Der silberne Hebel wird an sich von der Steuerscheibe bewegt und tut Zweierlei: Reibrad an den Teller legen und den Motor an- und ausschalten. Ich hab die kleine Feder einfach so umgehängt, dass das Reibrad jetzt immer anliegt.
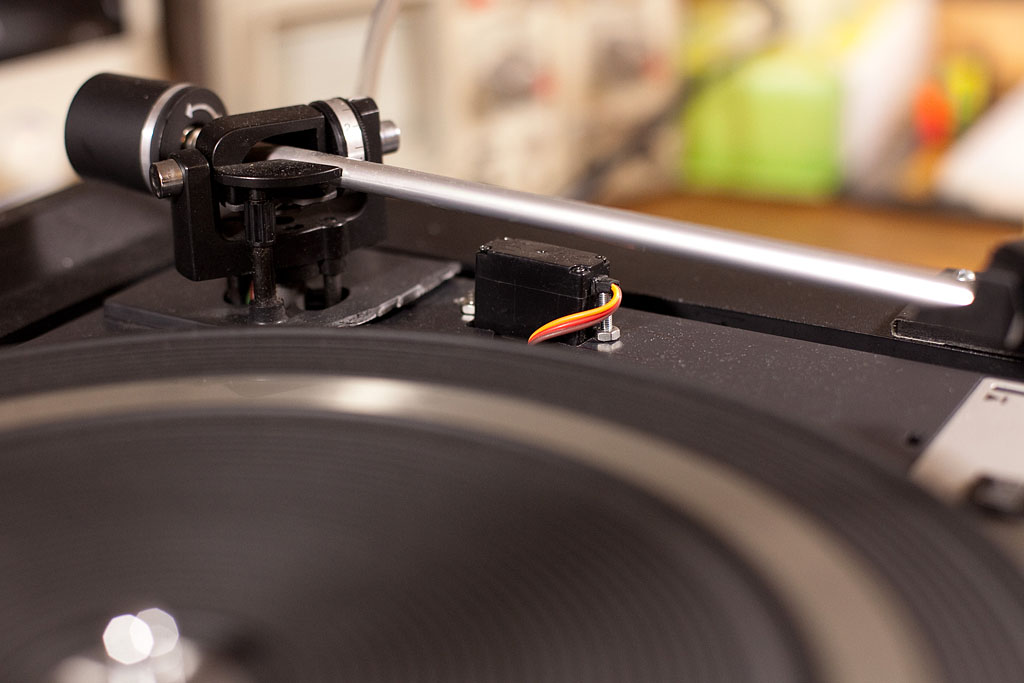
Der keine Billigservo, der den Tonarm hin und her bewegt. Genutzt werden ca. 160° seines Weges.
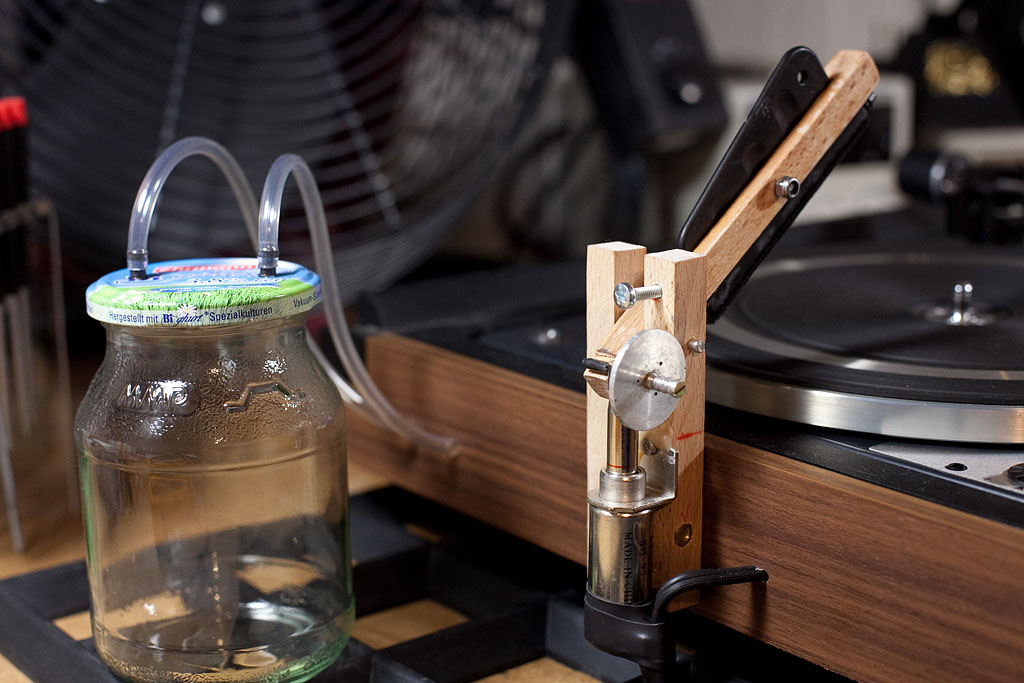
Der Bürstenhalter war etwas Frickelei in Buche. Nut gefräst für die Clearaudio-Bürste, mittig aufgehängt, um gleichmässigen Andruck zu gewährleisten. Der E-Magnet (auch Pollin) hat mächtig Wumms. An sich zieht er auch noch gegen eine straffe Feder an, mit der hätte die Bürste dann ordentlichen Andruck auf der Platte gehabt. Zum einen war das aber zu viel, zum anderen zieht er unter Last mehr als 3A bei 12V und das schafft mein Netzteil nicht auf Dauer. Daher habe ich die Feder entfernt und sorge für den Andruck mit ein paar Pfundmünzen. ![]() Wenn er einmal angezogen hat, ist die Bürste durch eine gewisse Verkantung stabil hochgeklappt. Schiebt man die Scheibe mit dem Griff hoch, liegt die Bürste wieder auf. Nachdem ich das Holz schön gewachst habe, quillt es auch nicht mehr auf und sorgt für Verkantungen...
Wenn er einmal angezogen hat, ist die Bürste durch eine gewisse Verkantung stabil hochgeklappt. Schiebt man die Scheibe mit dem Griff hoch, liegt die Bürste wieder auf. Nachdem ich das Holz schön gewachst habe, quillt es auch nicht mehr auf und sorgt für Verkantungen...
Die Absaugdüse hat sich auch mit der Zeit ergeben -- funktioniert jetzt aber so gut, dass ich sie so lasse. Basis ist ein Chupachup-Lollystil (leicht angekaut). Unten dran ist ein Stück ganz weicher Silikonschlauch, der perfekt über die Platte rutscht, auch wenn gut dran gesaugt wird. Zusammen mit der Reinigungsflüssigkeit flutscht das so glatt, dass ich mir den üblichen Faden gespart habe. Löcher und Führung für einen Faden sind vorhanden, das Trockenergebnis ist aber ohne Faden viel besser und ich ziehe keinen Schmodder im Faden durch die frisch gereinigten Rillen. War mir so sympathischer.
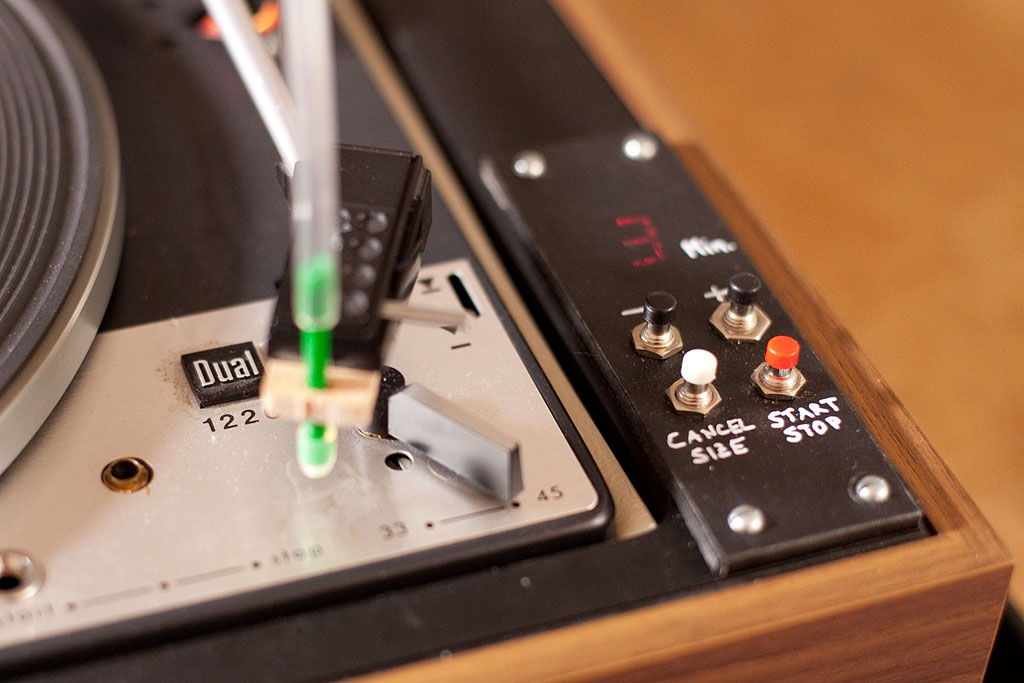
Rechts die Bedieneinheit... 4 Taster durch ein Stück Sperrholz gesteckt. Die Plastikwanne des Dual ist über 1 cm dick, da bekam ich keine Schalter drin montiert. Das Sperrholzbrettchen ist einfach mit schwarzem Tesaband überzogen (Lack trocknet immer so lange). Die 7-Segment-Anzeige für die gewünschte Waschdauer ist so hell, dass die magisch durch das Tesaband durchscheint. Sieht ungewollt ziemlich cool aus und man sieht meine Sägekunst nicht so. ![]()
Nochmal das Bedien-Panel:

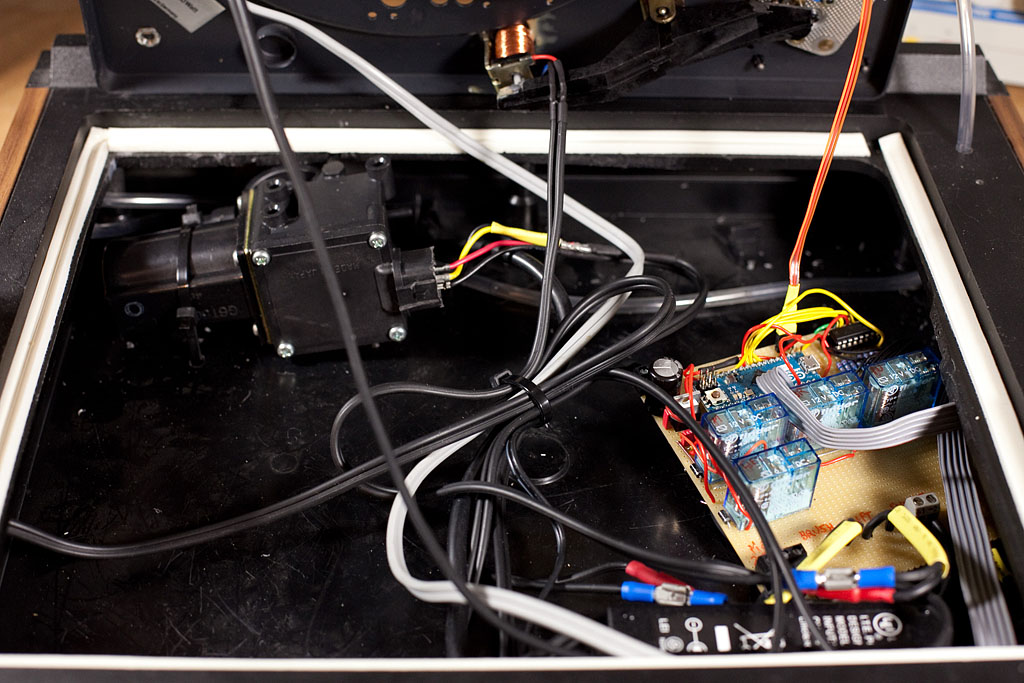
Blick in die Zarge. Mit etwas Trickserei habe ich alles in der Zarge direkt unterbringen können, nur das Abscheiderglas nicht. Aber das will man ja auch sehen. ![]() Praktisch ist, dass die PWM so echt kompakt geworden ist und prima auf dem Geraffelschrank stehen kann. Links hinten die Pollin-Saugpumpe. (Wenn man beide Ventile anzieht, saugt sie auch. Doh.) Rechts vorne sieht man den Rand eines alten Notebook-Netzteils... 12V und ca. 3.5A -- bis auf den Plattentellermotor wird damit alles angetrieben und versorgt. Rechts auf der Lochrasterplatine die Intelligenz des ganzen:
Praktisch ist, dass die PWM so echt kompakt geworden ist und prima auf dem Geraffelschrank stehen kann. Links hinten die Pollin-Saugpumpe. (Wenn man beide Ventile anzieht, saugt sie auch. Doh.) Rechts vorne sieht man den Rand eines alten Notebook-Netzteils... 12V und ca. 3.5A -- bis auf den Plattentellermotor wird damit alles angetrieben und versorgt. Rechts auf der Lochrasterplatine die Intelligenz des ganzen:

Links in blau der Arduino Micro. Das ist ein ganz einfacher, praktischer Atmel-Mikrocontroller, den man sehr simpel mit C programmieren kann und so einfach auch komplexe Steuer- und Regelvorgänge abbilden kann. Er steuert vor allem die vier Relais (jeweils über einen BC548 und Freilaufdiode), zum anderen aber auch das 7-Segment-Display. Dessen "Treiber" ist links oben ein CMOS 4511, das für BCD-Codes die richtigen LEDs ansteuert. Hätte der Arduino auch direkt gekonnt, aber so spart man ein paar Leitungen und ich hatte noch ein 4511. ![]() Eingangsseitig sind nur die 4 Taster angeschlossen. Ach ja, und den Servo steuert der Arduino auch direkt an (sehr komfortabel).
Eingangsseitig sind nur die 4 Taster angeschlossen. Ach ja, und den Servo steuert der Arduino auch direkt an (sehr komfortabel).
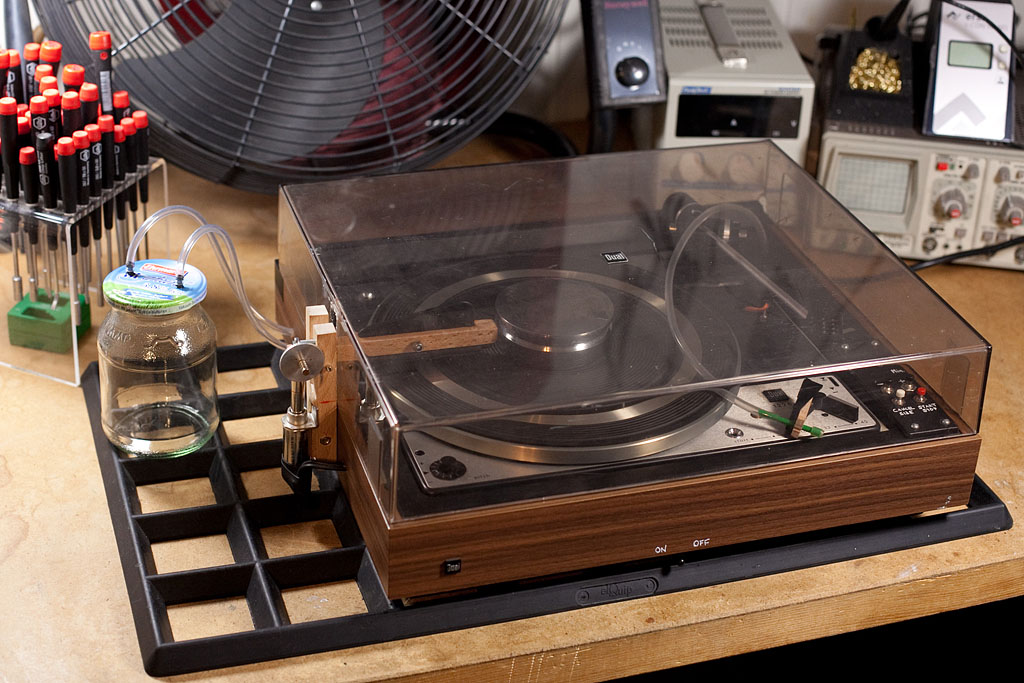
So sieht der Sauguino komplett aus. Die Saugdüse habe ich abgenommen, damit der Schlauch nicht verknickt. Im Regal kommt das Joghurtglas natürlich noch ab. Den zentralen An/Ausschalter muss man etwas suchen, aber nur hier war die Zarge dünn genug. ![]()
Super-8 Notch Ruler - New and Improved
17. Oktober, 2010Which film speed is that Super-8 cartridge notched for? Is that Tungsten or Daylight stock? Which ASA values can my camera read correctly and does it move the Wratten filter out automatically when daylight stock is used?
Since more than 30 kinds of Super-8 film are available today, most made in small batches, these questions are more pressing than ever before. The "Notch Ruler" that has been around for a while has some flaws, simplifies too much and thus leads easily to incorrect results. This is why I made two new, simple tools to clarify a confusing topic once and for all. Find out all about your favorite film stock now and understand how your camera is interpreting its notch codes.
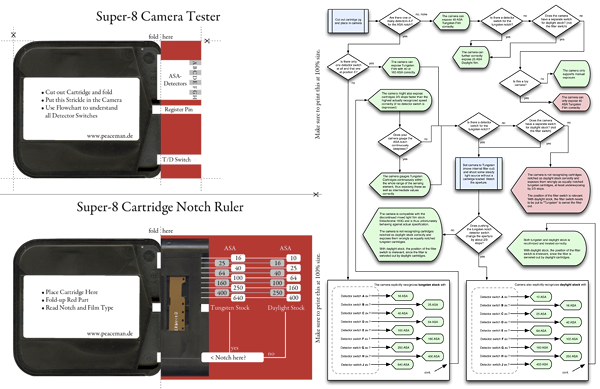
Download the new Super-8 Notch Tools as PDF
What’s wrong with the old Notch Ruler?
When using the well known Notch Ruler, I found three things annoying:
- The numbers are above the lines, not on the lines. This can easily be misleading. See below graphic – the 0.7" notch distance (3) of a Kodachrome 40 (1) result to 40 ASA, and both numbers are in separate lines (4)!
- The Notch Ruler does not make clear that it is intended for cameras, not cartridges. Using it on a cartridge leads to above problems.
- Even when used in a camera, the Notch Ruler suggests that the camera can read the film type correctly, all based on availability of a sensor switch. This is unfortunately not true, see below why.
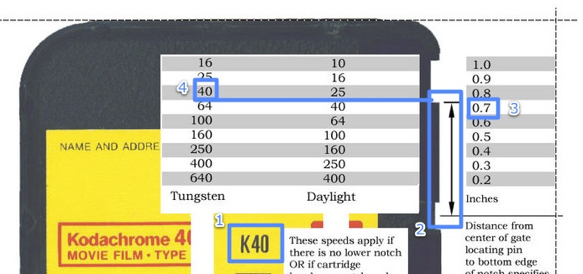
As much as I appreciate the effort of making and publishing it, I think it leads to more confusion and damage than it helps. Even if one uses it correctly, it doesn't mean that the interpreted results are right.
Why bother?
There was never a bigger variety of film stock available than there is in today’s market. This might make you wonder since small gauge film definitely is no longer a mass market – but since the famous Kodachrome 40 (K40) and its unique process K-14 have been discontinued, it suddenly makes sense for folks like Wittner, Spectra Film or Pro8mm to package recent film stock into that complicated cartridge and sell a certain volume. I am aware of 30+ different materials from 10 to 500 ASA, sensitized for Tungsten or Daylight, negative or reversal, color or black&white. But: How does your camera handle such obscure material?
One Cartridge and three problems
Not everybody has an exposure meter, manual exposure control or other ways to correct the camera's automatic exposure. Super-8 cartridges are supposed to "tell" the camera through two notches what Exposure Index and what Color Balance the loaded stock actually has. Unfortunately, this system has three main problems:
- Not all cameras recognize all kinds of notches
- The underlying specification is interpreted differently by various cameras
- Notches of Super-8 cartridges are not always punched correctly
To understand why this is, history tells the story: When Super-8 got to market in 1965, almost all available film was tungsten stock with 40 ASA, which effectively reduced to 25 ASA when the built-in Wratten filter reduced the light by ⅔ stops. This was true for Kodachrome as well as Agfachrome, Moviechrome and their various OEM cohorts from Port, Boots, 3M, Ilford, Perutz and others.
Years later Ektachrome 160T hit the market, requiring some 500W lamps less to actually shoot on Xmas Eve and still had 100 ASA Exposure Index when filming with filter in daylight. Fortunately, ISO-3067 and SMPTE-166 specified that the cartridge only needed a wider ASA notch to set the camera's internal light meter to the correct film speed. For decades, these were practically the only films on the market. Since continuous sensing of the width of a notch located that close to the frame window is mechanically rather difficult, many camera manufacturers made their life easy: They only distinguished with one or two little switches between 40 and 160 ASA cartridges. Good enough in those days. (Kodak's Instamatic and other cheapo cams even blindly expected 40 ASA all the time!) It is not smart to ignore a specification for cost reasons. It is however even worse to dilute a spec, especially if you are its inventor.
In 1974, Kodak brought the Ektachrome 160 Type G to market. Its color layers were reversed (green on top) -- due to this trick and a fairly low overall color saturation, the film no longer needed the Wratten filter. It worked equally good/bad with tungsten illumination as well as in daylight. Even though it had relatively fine grain and was quite sharp, it was always a compromise. The cartridge was notched as daylight film. Many cameras thus rotated the Wratten filter out and changed the (simply guessed) 160 ASA not to 100 ASA as the spec would have suggested it. Other cameras (like late Bauer models) did not have a sensor for the Tungsten notch at all and simply coupled the sensitivity to the camera's filter switch: 40 ASA without filter, 25 ASA with Filter (and equally 160 ASA / 100 ASA if the notch was somewhat bigger). It gets even more confusing: Some manufacturers labeled the camera inside with copy like "works with 25 and 100 ASA daylight film" -- actually meant was “Tungsten stock with filter rotated in”. Even some expensive Leicinas did not read the Tungsten notch, but allowed manual setting to daylight stock through a 3rd position on the filter switch.
It is also confusing that identical notch widths have differing meanings depending on the cartridge's color sensitization notch. It's a fact that it is like that. Why Kodak came up with this idea can only be guessed: The internal Wratten filter is located right in front of the film, not in front of the lens like other filters usually are. The viewfinder and the internal light meter usually do not "see" this little yellow-orange gel filter. To compensate the ⅔ stops of light loss this filter actually causes, the camera simply "told" the light meter a different, ⅔ stop-lower film speed (e.g. for Kodachrome 40T this was then 25 ASA). In reality, the film stock's speed does not change at all, it is just less light that makes it through the filter. I guess Kodak confused themselves through this "40T needs to be exposed like 25 ASA in daylight, so lets call the daylight speed 25 ASA" trick. Most likely, in some important meeting, it caused a sentence like "If K40 has 25 ASA in daylight, actual 25 ASA daylight stock should have the same notch size!"
New clarity through new tools: The Cartridge Notch Ruler and the Camera Inspector
Totally confused? Don't worry, you made it through the hard part, and there is light at the end of the tunnel even if you could not follow the above. Below find two simple, yet powerful tools. Just print and cut them out in 100% size, without any scaling. Put them, together with a copy of the flowchart in your camera bag and you will always be sure what kind of film stock and camera you have and how your camera recognizes that particular film stock.
What do these tools teach us?
- The new Ektachrome 100D gets recognized correctly in many more cameras than was its unlucky predecessor 64T. That's a good thing.
- The position of the filter switch is irrelevant in most cameras, since the absent Tungsten notch causes the filter to be rotated out anyway.
- Wittner's excellent WittnerChrome 100D, containing the same film stock, is notched to 64D. This causes a modest overexposure in higher end cameras that read correctly, however, this is good for skin tones and generally not a bad idea with this stock.
- Even Kodak treats the notching differently with recent cartridges sold. mentions that the Vision 200T is notched as 160 ASA. Measuring a Vision 500T shows it is notched as 400 ASA Daylight (!) stock. On the other hand, Ektachrome VNF 7240 as well as Plus-X 7267 are notched to actual intermediate values (125 resp. 32 ASA). It seems that Kodak uses the next spec'd notch for its negative stock, for reversal material they are more precise and allow values in between.
So what to do if your camera does not recognize your film stock correctly?
There is no single universal solution, but some hints may help. It does help to understand your camera, think through the above and try out. It is easy to alter exposure if your camera provides a manual exposure control dial. A contre-jour key or mode can help too, it causes about one stop more light on your film. Neutral density filters can only help if your camera does not meter light through the lens but externally. Sometimes, it can also help to widen the notch with fine pliers or to make it smaller with a patch of ribbon epoxy glue. A manual exposure mode or exposure lock can help must but be re-set for every scene. If your camera has a variable rotary disc shutter, closing that might help too to reduce the light getting to the film without the exposure meter correcting that by opening the aperture. Brave hobbyists "simply" remove the internal Wratten filter, but this locks you in to daylight stock only and does not help in all cases.
Last but not least, you can hand your camera in for service and get it adjusted for your favorite stock -- however this might lock you in to that one kind of cartridge. Check http://bit.ly/aW3cuz
Last but not least
One thing is crucial to keep in mind while studying so much theory: Our cameras are all 30-40 years old and have rarely been serviced on a regular basis. The built-in light meters are often adjusted more or less wrong or lost their linearity. So even if your favorite camera exposed K40 perfectly, it might fail with 100D even when recognized correctly.
You can verify your camera's light meter with comparing its results against a modern SLR or DSLR. Just set that to the same film speed as your film stock (so ISO 100 for E100D), the shutter time to 1/40 (or whatever your camera has, it's more 1/30 for XL cameras at 18fps) and compare the suggested aperture values for various motives in various light conditions.
The best way by far though is to sacrifice one cartridge to test your camera(s). Shoot a gray wedge in both bright and dark light, with various focal lengths and watch the results carefully during projection and with a magnifying glass. It’s worth it. Even turning the camera in for service is cheaper (and less frustrating) than dozens of cartridges which have been incorrectly exposed.
Super-8 Kassettentuning: Kerbendummy
28. August, 2010Manchmal möchte man, dass die Super-8 Kassette der Kamera einen anderen Filmtyp kommuniziert, als die Kerbung der Kassette es vorgibt. Dazu kann man sich ganz leicht einen Adapter bauen -- alles was man dazu braucht ist
- Etwas Vaseline oder Nähmaschinenöl
- Pattex Power Knete
- ein Teppichmesser oder Cutter
Man fette den Kerbenraum ein bisschen ein (Vaseline oder Nähmschinenöl auf Q-Tip) und danach drücke man etwas Pattex Powerknete in den Hohlraum. Nach aushärten zieht man den perfekt passenden Klotz wieder raus (am besten einen "Griff" mit einkleben!) und kann ihn mit einem Cutter auf die gewünschte Länge zuschneiden. Ich habe mir 5 solcher Klötze gemacht, die passen nach etwas Feilerei sogar auch in Kodakkassetten. (Und für die T-Kerbe hab ich auch einen, Klebeband ist für viele Abtaster nicht fest genug).
Das Beispiel zeigt einen Adapter, der die (untere) Kunstlichtkerbe verschliesst, um die Kamera Tageslichtmaterial erkennen zu lassen. (Wie in der aktuellen Schmalfilm nachzulesen schwenkt das nicht nur das kamerainterne Filter aus, sondern ändert auch die Bedeutung der ASA-Kerbenbreite!)
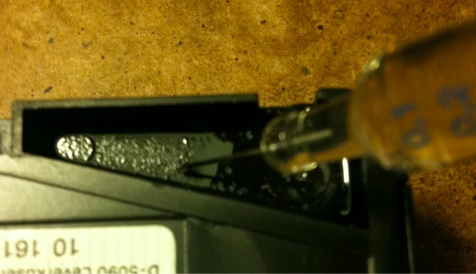
1: Einölen des Hohlraumes. War etwas zu viel Öl, daher mit Q-Tip wieder aufgesogen. Vaseline oder Cellophan tuts bestimmt auch als Trennmittel.
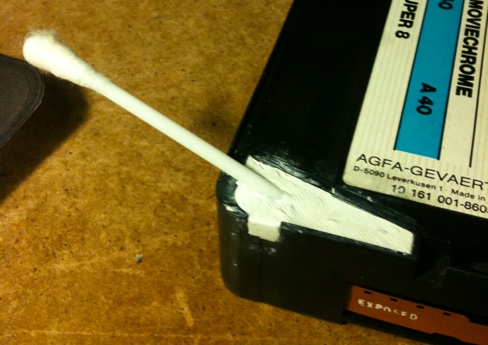
2: Einbringen der gut durchgekneteten Powerknete. Überstehen sollte nichts (Cutter oder Spatel zum anformen verwenden). Den alten Q-Tip habe ich zum leichteren späteren herausziehen versenkt. Eine Büroklammer oder so tuts auch. Mit propeln bekommt man die Knete auch ohne "Griff" wieder raus.
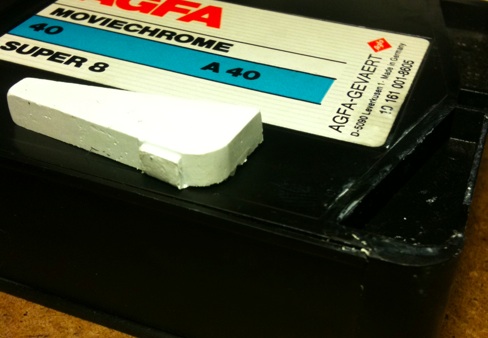
3: Der fertige Kerbenadapter, schon nach wenigen Miuten fertig. Passt genau! Die Powerknete lässt sich, wenn sie noch nicht völlig durchgehärtet ist, recht gut mit einem Teppichmesser bearbeiten. Hier und da ein bisschen abtragen macht den Adapter leichter zu handhaben.
Für einen ASA-Kerbenadapter schneidet man die Kerbe zunächst entsprechend weit auf (ASA 640 oder so) und schneidet das modellierte Adapterstück z.B. gemäß schmalfilm-Kameratester einfach auf die gewünschte Länge ab. Viel Spaß beim Kneten und Basteln ![]()
P.S.: Wer die Dinger in Serie knetet und schliesslich als Präzisionswerkzeug-gefertigte und Signaturgravierte ASA-Select-2000-Adapter o.ä. für zwei- bis dreistellige Beträge verkauft wird zu lebenslang verlorenem Bildstand und chronischen Perfoschäden verflucht!
Super-8 Cartridge Tweaking: Top Notch
28. August, 2010Sometimes, e.g. when I reload Super-8 cartridges, I want the cartridge notches to "tell" the camera correctly what kind of stock I actually loaded. Below is a quick DIY guide for altering cartridge notches easily to make the camera expose correctly. Widening or creating notches with pliers is easy, this is more about (partly) closing them. All you need this:
- Some Vaseline or oil
- Solid Ribbon Epoxy
- X-acto knife
The photos below show the making of an adapter to close the (lower) Tungsten notch, altering the ASA notch width works the same way though.

1: Lubricate the cartridge where the ribbon epoxy will go. Below I used too much oil, use a Q-Tip or so to remove it. Vaseline should work too.

2: Knead the ribbon epoxy well and fill it in the gap. Make sure there are no overlaps thus the cartridge does not get bigger than it was before. Stick a paperclip (or that Q-Tip) in the glue to make removing the part later on easier.

3: The finished Notch-Closer, ready after few minutes. Fits perfectly. Before full hardening, you can model the result with an x-acto-knife or so quite well to make it fit even better.
To alter the ASA notch width, do the same but shorten the resulting piece per Notch Ruler. This also works great in cameras that do not allow manual exposure override but can read non-standard notch-widths.
iCal Einladungen mit wählbarer Identität versenden
25. Juni, 2010Ein praktischer Hack von Matthew C. Mead:
- Als erstes iCal beenden, sonst gehts nicht!
- Jetzt ein Backup vom Standard-iCal machen. Dazu Terminal.app öffnen. Folgende vier Zeilen einzeln und nacheinander abschicken:
mkdir ~/Desktop/iCalBackup(fragt nach Admin Passwort)
sudo rsync -Eav --delete /Applications/iCal.app ~/Desktop/iCalBackup
sudo hdiutil create -format UDRO -srcfolder ~/Desktop/iCalBackup -volname iCalBackup ~/Desktop/iCalBackup.dmg


sudo rm -rf ~/Desktop/iCalBackup/ - Das resultierende .dmg gut aufbewahren, es stellt bei Bedarf die originale iCal.app wieder her.
- Matthews Patch runterladen. Am besten in den ~/Downloads Ordner, zumindest gehe ich unten von diesem Pfad aus.
Jetzt patcht Du iCal, wieder im Terminal zeilenweise abschicken:
cd /Applications(fragt evtl. wieder nach Admin Passwort)
sudo tar xvf ~/Downloads/SnowLeopardiCalSelectSender-20100215.tar
Voilà. Ab jetzt fragt iCal nach dem anlegen eines Termins mit Teilnehmern, unter welcher Mail-Identität die Einladungen verschickt werden sollen.


