

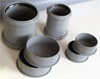
Inexpensive Super 8 home processing tank made from PVC drain pipes
Developing Super-8 stock yourself is fun, brings mostly great results and saves a lot of money. Below is described how everyone can do this now. You only need a handful of standard parts from the nearest DIY, a few tools and some patience.
Results are as good as home processing gets — I assume most people doing this take some uniqueness of the results into early consideration anyway. :-)

I got the idea for this project over time and partly while actually working on it — I'm sure there is room for improvements and thus I would appreciate any feedback! :-)
Shoppinglist for the DIY
You need:
Tools
|
|

Core Component
First we take the 3" tube to build the inner core of our processing tank. Trim it to 30.5" (77cm) - ask in the DIY if they can do this for you, thus you avoid saw dust and work. PVC is ductile. You now drill a minimum of 32 holes with your 3/8" (or bigger) wood drill into the pipe. The chemicals have to get well-stirred, so it's better to do a few extra. You now should deburr all holes carefully with the box cutter.

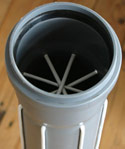 Now it is time to make the racks/spacers from the clothesline — this keeps the film strip
 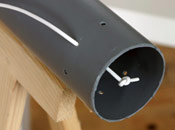 away from the pipe surface. To do this, drill 8 equally spaced holes in each end of the pipe. Through these you thread the clothesline: Start with a firm knot and "weave" through the pipe under constant tension. End with another knot, which should be as taut as possible.
 To increase precision, you should now fix the clothesline with some 4" strips of hot-melt adhesive. Roughen it to avoid bumpy seams, and keep it away from the pipe ends — we need space here to mount the film end with a stapled loop later on. Watch out that the adhesive does not creep out, cut all adhesive threads away carefully.

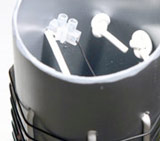
Now you need to sacrifice a film — exposed or unexposed, you need a small reel with 15m (50 ft) film that might get scratches while mounting the guide wire. It is helpful to mount this reel on a viewer or projector thus the film unwinds easily and straight. Staple one film end to a loop around the clotheswire and push the loop to the very left edge.
 Now you need to take your time and be sharp-eyed — take your glasses if necessary. Under tension rotate the core and wind the film from the left edge with its emulsion facing towards you around. The film has to be seated planar and solidly, and each winding has to have exactly 1 mm (~0.04") distance to the next. It is important to work accurately here -- better check the film distance every three turns with a little bell wire loop.
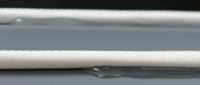
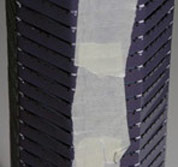
After a few windings, you will get a good feeling for "exactly 1 mm" and the procedure gets easier. Don't stop verifying though, take a ruler to check if 5 windings are exactly 44 mm (1.73") from most left to most right film edges. Fix the films position with a narrow strip of duct or masking tape. Once again, don't rush. If you are uncertain, make the core a little longer and leave a little space for tolerance. After about 64 windings the film should be spread over the pipe. Fix the end as the beginning, but through a rubber band loop to keep the film tensioned.
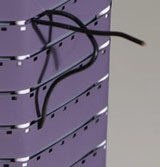
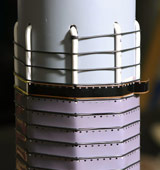 Now you wind the bell wire in-between. Drill a little hole next to the film's beginning and mount the bell wire with a tight luster terminal on the inside of the pipe. Again with heavy tension, unwind 15 m (50 ft)from the roll. It is important to unwind and not just pull from the ring to avoid radial windings of the wire! Fix the end with another tight luster terminal. The wire should be seated firmly and equally spaced on the clothesline, thus it stays were it is even if you touch the core in the dark.
You now can rewind the film on the wheel. Push the small slip-on sleeve on the thinner end of the pipe. Congratulations - the hardest part is done!

Outer core
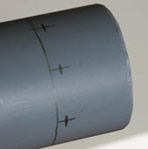
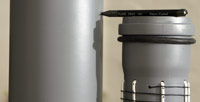 Now to the casing, which will hold the core with the film. Trim the big (4.3") tube — it should become 2" longer than the inner core. Push the big slip-on sleeve (110mm = ~4.3") on the thinner end, so far that the drain pipe socket plug is well leakproof but still removable with some torque. You need to try that out carefully.
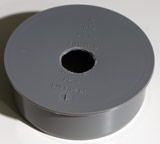
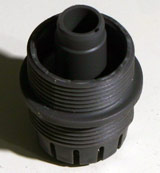
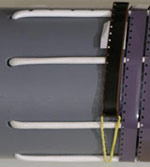
Drill a 1" hole into each drain pipe socket plug, if necessary, extend the whole carefully with cutter and round file. The hosepipe connectors should be right about screwable into these holes.
You now need to shorten one end of each hosepipe connector. They also need to be(come) light proof and should not expose any reservoirs for chemicals, so fill them up with hot-melt adhesive and make sure that chemicals can stream out fast and easily.
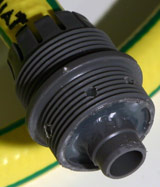
Using the cutter and one cap nut of the hosepipe connector as a jig, cut two 1" gaskets. The inner diameter should be just about 1". If you want, you can now also drill holes from the side through the hose connector, thus the chemicals can drain out easier. Unfortunately, I did not get the holes on the connector and the cap nut congruent — I think though I can afford losing a few drops of chemicals due to the remaining "footbath" :-)

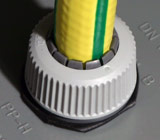
 Now mount the socket plugs with the gaskets, the hosepipe connectors and two 1.5 ft pieces of hosepipe. Tighten the screws really firmly &mdash you really want to avoid any light leaking in! For the connectors I used, the gasket was better placed on the (dry) outside. If in doubt, put gaskets on both sides.
If you have not done so yet, clean all parts now carefully. Important are the gaskets holding the socket plugs — mine were covered with silicone goo. I doubt the chemicals would appreciate that. Now put the inner core in the outer casing, push in the socket plugs — That's it!
25 comments

Hi there. I’m quite a handy man, but can’t figure out what the hell a super 8 home processing tank is? is it for photography? Thanks Thys

Hello,
this is by far the most impressive do it yourself i’ve seen - just wondering if I attempt it, do you have a recipe for the processing chemicals? or any advice on quantities
Allyn

this is amazing. i’ve been doing some serious research about home processing tank construction and this is wonderful. how many meters will it process in a single go? .amazing.
thank you, thank you.

very nice contraption ! how much solution does it takes to fill the tank?

I may have missed something! How am I supposed to use this thing? I don’t want to expose my undeveloped film to light. I want to load my film in total darkness(of course.)Is this easily done with my ’seeing-eye’ fingers? Thanks.

hey great tip, give us more info about the process or something else.

are slinkys made from stainless steel i wonder? you know, the kid’s toy that “walks” down stairs. a spiral groove in the right size pipe… expanding or contracting the slinky a little by rotation of one end will be possible. is there an anti-halation layer on the back of movie film? if so a stainless rod cylinder for the slinky would be better. don’t shoot movie myself so someone else is gonna have to go to the toyshop with the magnet… i bumped into this forum by accident but message me if the slinky really is chem. proof & you want to know how to build a stainless rod cylinder without welding. ‘bye now.

I love the slinky idea :)
Yes, there sometimes is anti-halation layer, which is annoying. A steel cylinder would have the disadvantage of pretty quickly getting solution’s temperature down though.

yes i agree with several others before me you should also post a good how to for processing film… i recently bout a Keystone Capri K28 and would love to use it but i don’t know much about 8mm so i need to figure out the right kind of film and a way to process it.

Hi there. Great resource, just starting to research super 8 coming out of uni. This page said I was a reported spammer? Not sure why.
Anyway, If you’d like to get ripped in 4 weeks then visit….

ok so i’ve made the processing tank….now how do i use it?

Hello, wonderful post! I am Brazilian and it is very difficult to sue an 8mm here. Searching on other sites, I found these instructions. It seems fantastic. I’m 26 years old and since I was 8 years old, I keep two cartridges that I filmed, but I haven’t a chance to process the filmed material. I have a huge care for this stuff and I can’t find opportunity and enough money to work it. I would like to give you a suggestion: it would be very helpful to readers a simple home video teaching building and mainly handling the tank, to lessen the chance of things going wrong, after all, in cases like mine, material is very important and the fear begins to prevail over the action of bringing images to life. Thank you very much, very nice anyway!
Good idea. I might make such a video – certainley on Super-8 then :) Stay tuned.
And don’t wait too long with your old cartridges, the latent image fades over time.

Guys, this is only the tank. You have to go into a dark chamber and follow a developping process. Lets say E-6 process. Of course you gotta get a the chemistry you need for that. Good luck. http://en.wikipedia.org/wiki/E-6_process

this is for development and processing of super and 8mm film stock,exposed,,you run the chemicals through the film tube core with processing chemicals in a dark room under red light,,then wash the film same way through the tubes,,you have to find chemical solution mix and stop bath,wash solution,,wrap you footage and develop then cut and hang dry,,yes someone should post a do it yourself video of the process,,be exact in chemicals,,go to kodak.com for chemical process plans,,,and buy chemical solution,,all you need at kodak,,,
oh and a great way to process your old kodachromw film that has been stoped processing everywhere on earth,,son if you ahve kodachrome still,,you can now try to process it,,,super 8,great,,,love this thing,,,yipeee,,,

You certainly deserve a round of applause for your post and more specifically, your blog in general. Very high quality material


Truely ingenious.
One problem, how would you keep the chemical temperature within range. I’m interested in developing negative film and 38 degrees is ‘fairly’ important.
The increased surface area would rapidly reduce chemical temperature.

Hi. I really liked reading your blog post!. Very good written content. I would have to suggest you to do articles even more frequently. This way, with such a helpful weblog I feel you will rank better in the search engines . I also subscribed to your Rss. Carry on the very good work! 00-)

You got some really good information here which is very well written. You seem to know every detail about this topic. Keep up the good work. =-=

Panerai Ferrari Granturismo Rattrapante,Panerai Ferrari Scuderia GMT,Panerai Luminor,Panerai Luminor Arktos,Panerai Luminor Automatic Tourbillion,Panerai Luminor Classic,Panerai Luminor

Has you had any problem controlling the temperature with this thing? Does the color turn out right? Is it as good as a Lomo tank?

http://www.peaceman.de/blog/index.php/weitergefuhrt-super-8-selbstentwickeln It shows the rest of the home development setup but is distant and features no assembly or chemicals necessary. Figured maybe it’s a step in the right direction for someone who can dissect the image reassemble it and share with everyone..